If you’ve ever been working on a Word document that includes images or photographs, figures, tables, or other objects, you’ve likely experienced the unfortunate situation of getting your object right where you want it, only to press one more key or click one more time, and POOF! The image whisks itself (or is whisked by unknown forces?) to another, incorrect location. In the face of this mysterious object leap, you follow that object . . . right down the rabbit hole into word processing frustration. Click upon click, move upon move, try as you might, you cannot get that image back where you want it, and your focus on your project, POOF!, also gone.
The problem with objects in Word is that they do not function like objects in life, which, logically, you pick up and put where you want them and, reasonably, expect them to stay there. In Word, however, there are lots of little options and properties that dictate—and may unpredictably change—the positioning of an object. Understanding those, which I will discuss in this post, puts you in a much better place to avoid the rabbit hole of object placement issues.
Get a free sample proofread and edit for your English document.
Two professional proofreaders will proofread and edit your English document.
Types of Objects
Word allows you to insert a few main types of objects. In this post I will be discussing illustrations, text boxes, and tables. Note that illustrations include pictures, shapes, icons, 3D models, SmartArt, charts, and screenshots.

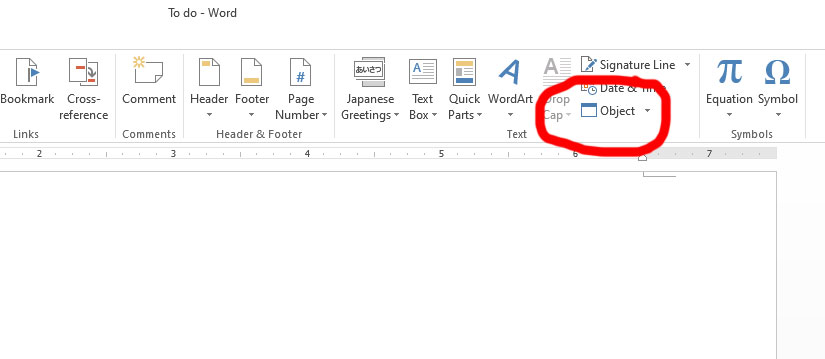
Layout Options for Illustrations and Text Boxes
To see the layout options for an illustration, click on the object and then click on the icon that appears to the right (circled in the image below):
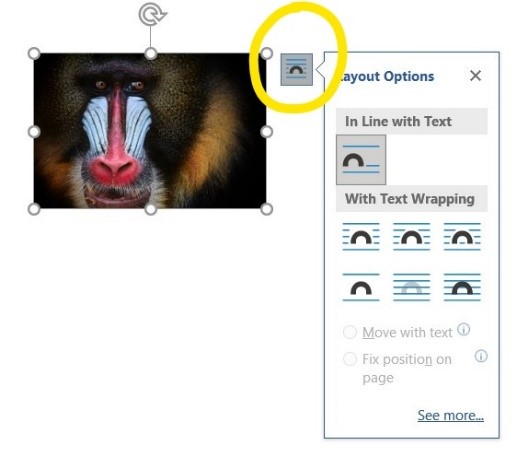
The options you may choose from include (as shown above) “In Line with Text” and “With Text Wrapping.” The icon for each option shows you how the object will appear relative to the text on the page. For the object above, I chose “In Line with Text”; note that it is positioned just like the black arc and blue “lines of text” in the icon. Choosing this option means the object will appear like a character in the line of text. Because the object is taller than a letter, there is blank space on the page next to it and possibly above it, just like there would be if you made the font size for some of your text much bigger.
If you choose “With Text Wrapping,” the text will fill around the object like you might see in a newspaper or magazine.
In the example, the text appears beside this object. Here, I chose “With Text Wrapping” and then clicked on “See more” (both indicated with arrows at the left), which opens the Layout window. There, in the “Text Wrapping” tab, I chose to have the text appear only to the right of the. The Layout window gives you quite a few more options related to position, text wrapping, and size.
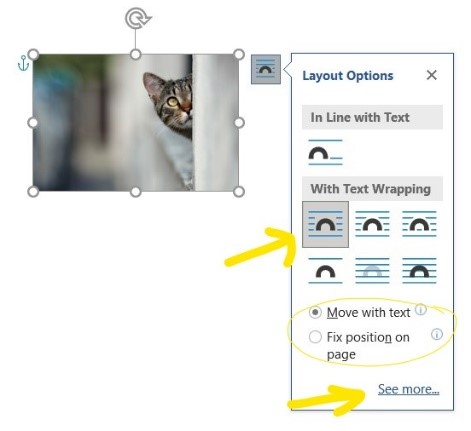
Regarding the options “Move with text” and “Fix position on page” (circled in the image at the left), clicking one or the other of those does exactly what it says. For this object, I’ve selected “Move with text.” This means that if I were to add, say, two lines of text above the object, the object would move down. If I were to choose “Fix position on page” and add two lines of text above the object, the object would stay put and the text would move to fill in to the right of the object. Note the small blue “i” you can hover over for more information on what the options mean.
Layout Options for Tables
Layout options for tables are largely the same, though finding them is a little different. If your text contains a table, click on it and you will see menus “Table Design” and “Layout” at the top right (circled below):

Click on “Properties,” (indicated with an arrow above) and you will see the Table Properties window (below, right). Click on “Positioning” and see the Table Positioning window (left).
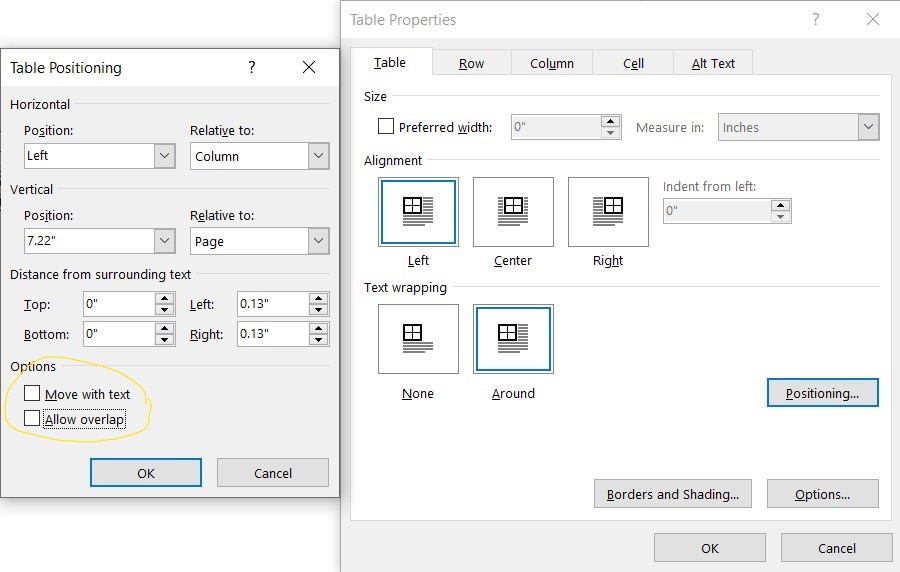
Note the options at the bottom of the Table Positioning window: “Move with text” and “Allow overlap.” If you are struggling to get your table to stay put, adjusting these settings can help.
Additional Tips
Other versions of Word may be unlike mine in some ways. If the path to the information you seek in your version of Word differs from my description, Googling or searching in Word’s help menu for the name of the property, option, or menu you are looking for will generally turn up the information you need.
Finally, here are a few more general tips you may find useful if to be successful in object placement:
Sarah P.
Get a free sample proofread and edit for your English document.
Two professional proofreaders will proofread and edit your English document.
Get a free sample proofread and edit for your document.
Two professional proofreaders will proofread and edit your document.
We will get your free sample back in three to six hours!


© 2010 - 2020 ProofreadingPal LLC - All Rights Reserved.